Friday, 30 December 2011

Automatic Electric Step

The weather has not been up to much lately, so haven't managed much work on the van. Started fibreglassing over the joints to the blue lights on the roof, but got rained off.....

Managed to find an electric step off a mini-bus at a local scrap yard that fits great under the side door. It was minus a control box, but I rigged up my own using two relays wired to the step's micro-switches.


I rigged up my own mounting brackets underneath. The front ones were quite easy as there was some metal box-section frame for the sliding door. The back fixing needed a length of my own box-section strapped between the chassis framework. No need now to carry round the stepping stool that I've been lifting in & out


Its going to need a revisit to finish, as I got rained-off. The step is presently working in a semi-automatic mode via a switch inside, but needs a feed running to the sliding door 'light switch' plunger that will make it activate with the opening/closing of the door. 


Changed the switch labels on the main control panel to white on black


Trimmed around the over-cab doors a few weeks back, but don't think I posted any pics...

Sunday, 6 November 2011

Flooring

Been a bit quiet on the van lately. The inside is more or less finished, just a few cosmetic tweeks and finishing touches really.

Managed to source & fit some decent vinyl flooring today.


If you've been following my blog for a while, you'll remember I fitted a scrap piece of roll-end to tide me over for a bit. I was able to use this as a template for the majority of the area, particularly for the rebates & cut-aways.


I removed & sprayed the bright yellow protector plates silver a few weeks back, so they were ready to screw straight back on when I'd finished. Decided to glue some vinyl in the step as well to finish it off.


I originally removed the bright orange grab handle when I lined the wall underneath, and decided to leave it off. However, I found that there was a tendency to grab hold of the seat/bed end panel when you were climbing in, which would obviously weaken it. It was then sprayed satin black and fixed back on.....


I also painted the wheels recently, which were the same bright yellow as the van.
Went for a silver & black look.


Almost ready for painting now, which I'm hoping to get done over the winter period.
Still using the Aquaroll drum in the boot for my water too, so could do with fitting my big on-board water tank at some stage ready for next  season's camping.....


Monday, 26 September 2011

September update

Not managed to do a great deal recently, but I'm not far off finishing the interior now....

I've knocked up a table using an off-cut of MDF and covered it with the left-over of the Silver Vinyl that I used as a wallcovering in the kitchen area. This has a screw-off leg and folds away behind the crew-seat when not in use. It also sits across the battery-box seat as part of Josh's bed. The third bed (Josh's) is now formed by swivelling the front passenger seat facing rearwards and reclining the back flat with the headrest removed. The table has 2 battens on the underside that sit each side of the battery-box seat to locate it & prevent it from slipping off. I am using a roll-up self-inflating camping mattress that sits over it all when in place. Similar to the main double-bed, takes less than a minute to put up.....


I refitted the original ambulance 12v map-light that is on a bendy stem.
This looks like it will be quite useful as it is bright & very versatile. It is positioned
over the table area, but bends to a variety of places....... 


I've also tidied up the fuse panel area, and made a proper click-shut access door for it. I've cut a bit of foam from the old over-cab ambulance doors to make a backrest for the 'battery box seat' and covered it with some of the old grey carpet that covered the now removed cab partition. I've also lined the battery box seat and surrounding MDF with the last remnants of the carpet and started on the last bits of exposed cream-fibreglass from the ambulance interior with my grey van-lining material. The cupboard doors have eventually been trimmed & fitted to the over-cab storage area. Part of the off-cuts have been used to make the backrest to the 'battery box seat'.


The 3000w inverter supplies power to the microwave, kettle, toaster, water-heater
and the 240v sockets for additional appliances (hairdryer, straighteners etc.). It vents
from the front (socket side) and out back (battery side). It sits on 2 x 140ah leisure batteries
that are charged via the roof-mounted solar panel.


I have replaced & rewired the inverter on/off switch to an illuminated one on my control panel. This allows you to see that it is switched on, and acts as a reminder not to leave it on. I have also wired the inverter through my Mains Contactor, so as to share the same mains wiring & sockets. The contactor also has a switching relay that disables the inverter once the mains hook-up is attached.


The nickel push-fixings from the old overhead doors were used on the new ones.


Saturday, 20 August 2011

Crew Seat, Temp Flooring and more Wiring...


The van's coming on really well now. So far I've got up and running:-
Hot & cold running water plumbed into kitchen & bathroom, electric flushing toilet, shower, gas grill and gas hob.
Mains hook-up with consumer for site electrics or garage connections. This is connected via a contactor that allows use of the same circuits for both Mains and Inverted power Sources. It automatically switches over when mains electric is connected via the external mains socket.
Microwave, Kettle, Toaster and Water Heater running off solar panel rigged to 2 x 140ah Leisure batteries and mains inverter.
3 way fridge running on 12v, 240v mains and gas.
Eberspacher Diesel Air Heater for the cabin, Flat Screen TV/DVD, 3x USB Charge Points (front, middle & rear)
Bluetooth iPod connected ICE with 6 way Kenwood speakers.
LED low energy lighting. (12v)
Halogen Lighting. (12v)
Blue LED mood lighting. (12v)
Extra Crew Seat with travelling for 4 (seatbelt restrained)


Plumbed in the gas yesterday, so was able to box in the appliances
and faced of the undersides of my fabricated units to neaten them off.


Managed to blag a piece of 'scragg-end' wood effect vinyl when I bought the grey stuff for the kitchen walls. Wasn't quite wide or long enough for a proper fit, but it does the job great until I can get round (and afford) to fit the proper finished stuff.

Still need to box off the overhead cab-locker storage area and design some sort of table/sleeping area at the front.
Starting to look the job now though.


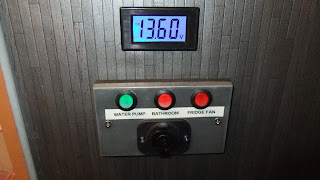
Main Control Panel above for the cabin electrics. I rewired the switch for my power
inverter to work remotely on the panel. It also illuminates when on so it shouldn't
be left on inadvertently.


Control Panel for Galley


Friday, 19 August 2011

Kitchen & Shower Completed


Dropped lucky with the toilet hatch. Didn't hit any steel supports, but had
to fit it over a rebate in the van body. Used part of the cut out as an infil... 


The walls of the van are already well insulated, so I'm hoping we
won't be getting many issues with condensation etc.


Knocked up a narrow drawer above the fridge for cuttlery