Sunday, 15 May 2011

Rewire Problems

Manage to have a look at the dash electrics problem today. Weather still crap but most of the messing was inside the cab.
I reconnected all the cables that I snipped back the other day, but still had no power to the dash clocks.


Decided to bite the bullet and rip out the clocks in order to trace the cables back into the loom. If I couldn't find a multi-plug that had come unclipped, I could trace the cables back to source or rewire each instrument from scratch (but was not relishing that task).


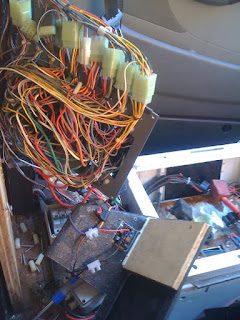
Everything seemed to be where it was supposed to be. As the problem caused all the dash to be dead and not just one or two items, it seemed to point to an earthing issue. If I could identify & re-fit an earth (without an electrical schematic) it may remedy the fault.

After all this bad luck, it was only right that I would drop on a bit of good luck. The other work I had done involved fitting an alarm. This was fitted directly to the Sprinter battery, so did not interfere with any of the Mercedes/ambulance wiring. However, I did share an earth bolt under the bonnet.......

A quick inspection found a tatty 'chock-block' that had been used previously to splice a connection, with a skinny brown earth wire corroded that had come out of a connection. Must have been when I undid the earth bolt from the cluster. It seemed too good to be true, but I reconnected it to the chock-block and voila!! Everything back up & running. (dash in a thousand bits though)
I stripped back the cable then soldered & taped the joint to prevent this re-occuring. 


The cluster of earth connections on the engine bay bulkhead.....

                                                       
Happy Days
I then decided that as the dash was now ripped out, it would be prudent to give that a bit of a revamp. There are a number of screw holes and cut-aways from loads of ambulance related equipment that had been stuck all over it. Not sure yet whether to fill & paint or fill & upholster...... 

Saturday, 14 May 2011

Electrics

Fitted an alarm this week. Thought it would be useful due to me leaving tools and stuff in the van whilst mid-jobs.

Run it for a few days loose-fitted to the auxilary battery, seemed to work ok so hard-wired it all to the Sprinter main battery under the bonnet. Whilst fitting the flashing LED to the dashboard centre console I decided to rip out all the now obsolete ambulance-related switch gear that was cluttering up the purpose-made switch panel. (I have a plan to put either a sat nav or reverse cam screen in its place)

All went well until I decided to fire up the van to boost the battery..... No power at all to the dash display. (no speedo, rev counter, fuel/temp gauges, the full works). Van was running fine though, so shouldn't be anything too major. Can't understand why feeds to Blue Lights, Siren, crew-lights etc would affect the dash clocks though. Too wet to investigate today, will hopefully bottom it tomorrow....

On the plus side, all this wet weather has identified a leak in the roof thro a corroded fresh air vent, which I have now fixed. Luckily it was discovered before the main interior fit-out has commenced, otherwise there would have been a fair bit of water/flood damage. This was done last weekend, and a quick check this afternoon (between showers) showed the insides to be dry.

Monday, 9 May 2011

Roof and Ceiling

I decided to cut away most of the roof panel and get rid of the bright orange grab handles in order to fit a more modern looking tongue & groove cladding for the ceiling. With hindsight I cut away too much because the remnants of the roof panel was used to fix the cladding to.

Halfway through the roof build, my solar panel arrived. It is the 40w panel, and was the biggest size my budget could stretch to (around £90 off ebay). I also managed to get a Status Omnidirctional aeriel before I even bought the van, again off ebay. Both of these needed fitting before the new roof was fitted, but couldn't be fitted until the old roof was ripped out.


Job done with the electrics topside, so work back inside on the roof cladding can continue....

I integrated my lighting into the panels as I went along. Managed to source these from a marine/boat supplier off the internet. Most marine fittings run on 12v DC electric, similar to cars/campers.  I chose some quite smart looking bezel mounted low power LED's for general ambient/mood lighting, and 4x 10w halogen downlights for any heavy-duty stuff we may need. These really are quite bright and a worthwhile addition.
The existing roof-fan and skylight would be useful items for a campervan, so these were retained and worked around with the new roof.


A shot of the finished cab cutaway with the new seats fitted. Again with hindsight, the roof would have been better done before the cab was opened up, because the mess caused by the angle-grinder is still being cleared up now.....


I decided to keep the existing cupboards for storage. I was initially going to remove the doors and replace with a finished timber. To keep the budget down I decided to try facing them with wood-effect fablon and see how they looked. I am quite pleased with the outcome and will be leaving them like this for the time being. 


A rag, a stanley knife blade and a fair bit of patience were the only tools required.
Looks half-decent. If it doesn't start peeling-off after a few weeks, I'll probably be keeping it on. The beauty being you can just peel it off and paint or replace the existing doors if you get fed up...

Getting Started

Having only recently started my blog, I am a bit behind with the postings. I'll try to drip feed the pics in over the next week or so with the jobs done so far until I'm up to date. The actual graft started mid March/early April....

The van back home ready for gutting...


Stretcher, cupboards, drawers etc. ripped out. Keeping the overhead lockers on the LH side for storage.

This photo shows the cab bulkhead partition partly cut away, but was a trickier job than it looks because it is also a thoroughfare for the majority of the rear electrics. The main van electrics were also mounted on the bulkhead behind the front passenger seat.

You can see in this photo too the crappy looking roof with its bright-orange grab-handles which had to come out.

The front seats have been swapped with a pair of swivel Captain Seats from a Renault Espace bought from a scrappy up in Preston. The rails were same width, but needed a frame knocking-up to regain the rde height of the original Sprinter seat, which sits on a factory made base-box. The cab had already been cut away & reinforced by UVG ambulance converters. There is a large stainless steel box-section frame fixed to the cab between the truck and the main body to maintain rigidity and keep structural integrity.


Definitely one of those jobs you wish you hadn't started! Managed to find & rip out headlamp flasher relay, 3x different stobe units & relays, siren control unit & relay and a few other ambulance related elecrics that I was not likely to be needing.

Headlamps & horn then didn't work, but a bit of back-tracking got the wheel back on!

All the vehicle electrics had been rewired at the coachbuilders into a MCB board, shared with ambulance related wiring (oxygen pumps, power sockets, lighting etc) so it was not just a case of ripping it all out. For the time being though, the board with the MCB's was fixed to the bulkhead behind the passenger seat, so needed disconnecting & moving so the bulkhead could be properly cut away. A bit of patience & masking tape for labels did the trick. I thought about leaving in situ (like on the picture of the cut-away) and using as a support for a table, but the extra effort was worth it in my opinion in the end, as the open cab greatly increases the overall living area....


This is the new semi-permanent location of the electrics. I will be adding a 'crumping' leisure battery to run my electrics so this area will be boxed in with a larger box area for at least 1 (poss 2) leisure battery at floor level. I will be building a storage box to house the battery area that will have a padded lid and double as a stool/seat.
This is my first attempt at a conversion, and the main thing I've noticed is that there seems to be about 10 different jobs on the go at any one time and particularly with the interior fit, everything needs to interlace & overlap, so thought and consideration is required before starting anything. There is little yet that I have seen that you can set out to start & complete in one go. Whilst starting the interior, I managed to source a fresh bumper & grill from ebay. The old grill has cut-outs for blue-strobes, which need removing. The bumper has a large cutaway for the siren under the OS headlamp, which also needs to come off. These weren't part of my initial budget, but came to about £16 & £40 respectively so were worth the extra effort.
The ebay bumper had some minor damage to the long thin vent strip that you can see on the older photo above the number plate, hence the cheap price.

This was cut away altogether, filled-in and replaced with some boy-racer style mesh grill....


Most of the bodywork is in decent nick, but the bumper removed offered the opportunity to get at & treat any little patches here and there. A stitch-in-time, and all that... 


Sunday, 8 May 2011

Sourcing a van

After many weeks trawling ebay, young Josh and myself eventually took a trip down to Stafford to have a look at a Mercedes Sprinter Ambulance. A minor fault on the air suspension upon viewing offered the opportunity for some healthy bartering (and later proved an easy fix).
Milage quite high at 263k, but looks like its had a new engine; runs sweet as a nut and not even a puff of smoke on start up from cold.


Overall, a decent buy that I'm well pleased with. Now for the hard work....