The van back home ready for gutting...
This photo shows the cab bulkhead partition partly cut away, but was a trickier job than it looks because it is also a thoroughfare for the majority of the rear electrics. The main van electrics were also mounted on the bulkhead behind the front passenger seat.
You can see in this photo too the crappy looking roof with its bright-orange grab-handles which had to come out.
The front seats have been swapped with a pair of swivel Captain Seats from a Renault Espace bought from a scrappy up in Preston. The rails were same width, but needed a frame knocking-up to regain the rde height of the original Sprinter seat, which sits on a factory made base-box. The cab had already been cut away & reinforced by UVG ambulance converters. There is a large stainless steel box-section frame fixed to the cab between the truck and the main body to maintain rigidity and keep structural integrity.
Definitely one of those jobs you wish you hadn't started! Managed to find & rip out headlamp flasher relay, 3x different stobe units & relays, siren control unit & relay and a few other ambulance related elecrics that I was not likely to be needing.
Headlamps & horn then didn't work, but a bit of back-tracking got the wheel back on!
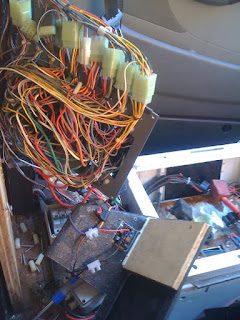
All the vehicle electrics had been rewired at the coachbuilders into a MCB board, shared with ambulance related wiring (oxygen pumps, power sockets, lighting etc) so it was not just a case of ripping it all out. For the time being though, the board with the MCB's was fixed to the bulkhead behind the passenger seat, so needed disconnecting & moving so the bulkhead could be properly cut away. A bit of patience & masking tape for labels did the trick. I thought about leaving in situ (like on the picture of the cut-away) and using as a support for a table, but the extra effort was worth it in my opinion in the end, as the open cab greatly increases the overall living area....
 This is the new semi-permanent location of the electrics. I will be adding a 'crumping' leisure battery to run my electrics so this area will be boxed in with a larger box area for at least 1 (poss 2) leisure battery at floor level. I will be building a storage box to house the battery area that will have a padded lid and double as a stool/seat.
 This is my first attempt at a conversion, and the main thing I've noticed is that there seems to be about 10 different jobs on the go at any one time and particularly with the interior fit, everything needs to interlace & overlap, so thought and consideration is required before starting anything. There is little yet that I have seen that you can set out to start & complete in one go. Whilst starting the interior, I managed to source a fresh bumper & grill from ebay. The old grill has cut-outs for blue-strobes, which need removing. The bumper has a large cutaway for the siren under the OS headlamp, which also needs to come off. These weren't part of my initial budget, but came to about £16 & £40 respectively so were worth the extra effort.
The ebay bumper had some minor damage to the long thin vent strip that you can see on the older photo above the number plate, hence the cheap price.
This was cut away altogether, filled-in and replaced with some boy-racer style mesh grill....
Most of the bodywork is in decent nick, but the bumper removed offered the opportunity to get at & treat any little patches here and there. A stitch-in-time, and all that...


thanks for the posts. I intend converting my ford transit ambulance soon
ReplyDelete